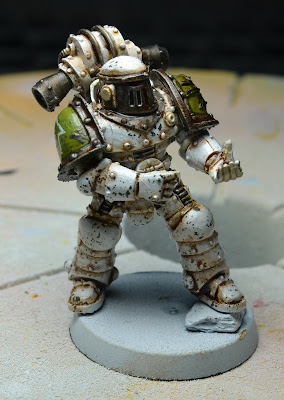
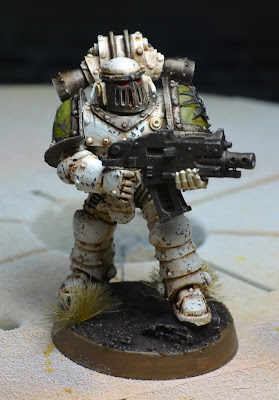
The method I use is based in part upon Forgeworld's own guidance for painting the four legions covered by Betrayal. The excellent guide can be found here.
Step 1.
The model is undercoated with a thin coat of Vallejo primer. Once fully dry (normally I allow 24 hours for it to completely set) I then covered the model with a suitably thinned coat of Tamiya Flat White via my airbrush. The model was then left somewhere safe to dry.
 |
| Step 2. |
Once the first two coats were fully dry I then applied a thinned layer of Seraphim Sepia into the crevices and other details to provide a off-white shade. Originally I experimented with using Lahmian Medium (as per the Forgeworld guide) but I found that this resulted in a darker, thicker shade than I wanted. I now use Vallejo airbrush thinner - which really helps thin the shade). Using a standard brush I attempted to keep some areas of the armour white. However I wasn't too upset if I didn't - one of the challenges of using a thinned shade was that it flows quickly over the model.
 |
| Step 3. |
A while waiting for the shade to fully dry I blocked out the green shoulder pads with a thinned coat of Castellan Green. Straight out of the pot I find it is a bit too thick so a small drop of thinner helps it flow better - however it also reduces the coverage (over white) considerably so two thin coats may be necessary)
 |
| Step 4. |
With the thinned Seraphim Sepia dry, I then layered a thinned coat of White Scar over the main armour plates while making sure I left sufficient sepia still showing through. The thinned White Scar also created a mid-shade between the white of the base coat and the Sepia shade.
At the same time I applied a thinned coat of Elysian Green to the shoulder pads. Finally all the metallic areas were given a coat of thin Leadbelcher (un-thinned I dislike the consistency of the paint but with sufficient Vallejo thinners, it becomes a great paint to work with.
 | |
| Step 5. |
All metallic areas were given a generous coat of Army Painter Strong Tone. It acts like a slightly thicker version of the (very) old citadel inks and gives a dirty, dark shade to the metal areas. I could probably have achieved a similar result by mixing Agrax Earthshade and Nuln Oil.
 |
| Step 6. |
The Astartes eyes were treated to a thinned coat of Mephiston Red. The Death Guard icon on the shoulder pad was painted black.
 |
| Step 7. |
With the model painted and shaded to an appropriate level, I started on the weathering to turn the 'far far too clean' armour into something closer to how I've always imagined the Death Guard to look.
Water slide transfers were applied to the blank shoulder pad with a layer of Micro Set used to make the transfer adhere to the surface.
Using a small piece of sponge torn from an old Citadel blister pack, I applied Stormvermin Fur to the model. The sponge was dipped into a slightly watered down layer of paint, the excess removed by pressing the sponge against some scrap paper. Once most of the paint had been removed, I then lightly applied the sponge to the areas of the model I thought would have the most damage or wear. Generally I apply more weathering to the lower half of the model.
 |
| Step 8. |
The whole model was given a thin coat of gloss varnish with my airbrush. I normally use Vallejo Gloss Varnish as it's quick drying and can be thinned quite well.
Once the varnish was dry (I gave it about 5 minutes for this example), the model was then coated with Low Odour Thinners with an old brush. Low Odour or not, this stuff isn't pleasant to work with but it's considerably better than Turpentine or White Spirit.
With the model covered, I then applied a very thin coat of Burnt Umber oil paint. Normally I add a small amount of Burnt Umber paint to a pool of thinners to produce a oil wash.The key is to have it thin enough. The was should be semi-opaque at most. When applying the wash, I apply small amounts using an old detail brush. By holding the brush to the recesses and lines of detail, the lower surface tension of the wash results in capillary action pulling the wash along the detail.
Again if I've got the wash thin enough, it will flow out onto the armour plates themselves. I will then remove any excess via a pointed cotton bud or scrap paper.
 |
| Step 9. |
The oil wash takes a while to dry (especially when my Lord of Terror is withholding use of the hair-dryer...). I normally leave it overnight.
Once fully dry, the base was completed using a dark textured paint to offset the semi white miniature. In this case I used Stirland Mud, with Eldar Flesh dry brushed over the top. The whole base was then washed with Agrax Earthshade.
 |
| Completed Model |
 |
| Completed Model... again |


No hay comentarios:
Publicar un comentario