7. การทำสีเริ่มต้นจากใช้ airbrushพ่นสีรองพื้นส่วนหน้าผาด้วยสีดำ และพ่นส่วนหิมะด้วยสีขาว
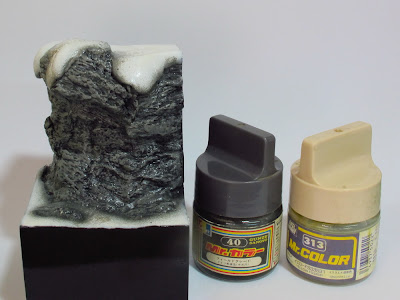
8. Mr. Hobby (GSI Creos) colour no. 40 German Grey is mixed with no. 313 Yellow FS33531 and drybrushed over the rock area to imitate the first layer of shadow.
8. ใช้สี GSI เบอร์ 40 German Grey ผสมกับเบอร์ 313 Yellow FS33531นำมาดรายบรัชในส่วนของหินทั้งหมด เพื่อจำลองส่วนของแสงในชั้นแรก
9. Mr. Hobby no. 42 Mahogany is added to the mix used earlier to help lighten the tone. It is then drybrushed over the area, leaving only the darkest recesses.
9. นำสีน้ำตาลเบอร์ 42 Mahogany มาผสมเพิ่มเข้าไป และเติมสี 313 ให้สีอ่อนขึ้น แล้ว ดรายบรัช drybrushทับอีกรอบ โดยเว้นในส่วนของร่องเงาเอาไว้
9. นำสีน้ำตาลเบอร์ 42 Mahogany มาผสมเพิ่มเข้าไป และเติมสี 313 ให้สีอ่อนขึ้น แล้ว ดรายบรัช drybrushทับอีกรอบ โดยเว้นในส่วนของร่องเงาเอาไว้
10. The third layer of drybrush is done by adding white into the mix. Focusing only the areas where light would fall, the edges and ridges of the rock formation are drybrushed. As I intend to imitate the light coming from the upper right direction (shown by blue arrow), the shadows would mostly fall towards the lower left direction (see red arrow). This technique of “light source” helps making the cliff look less flat.
10. ผสมสีขาวเพิ่ม แล้วดรายบรัชเป็นชั้นที่ 3โดยในรอบนี้จะเน้นการดรายบรัชเฉพาะส่วน เฉพาะบริเวณส่วนสันของก้อนหินในจุดต่างๆ ซึ่งผมได้กำหนดทิศทางของแสงให้ส่องจากทางด้านบนขวามือของภาพ (ลูกศรน้ำเงิน) ดังนั้นบริเวณของเงาจึงเกิดอยู่ในบริเวณด้านใต้เยื้องไปซ้ายมือ (ลูกศรแดง) วิธีการนี้จะช่วยให้สีของหน้าผานั้นดูมีแสงและเงาที่ส่องกระทบอยู่ และทำให้หน้าผาไม่ดูแบน
10. ผสมสีขาวเพิ่ม แล้วดรายบรัชเป็นชั้นที่ 3โดยในรอบนี้จะเน้นการดรายบรัชเฉพาะส่วน เฉพาะบริเวณส่วนสันของก้อนหินในจุดต่างๆ ซึ่งผมได้กำหนดทิศทางของแสงให้ส่องจากทางด้านบนขวามือของภาพ (ลูกศรน้ำเงิน) ดังนั้นบริเวณของเงาจึงเกิดอยู่ในบริเวณด้านใต้เยื้องไปซ้ายมือ (ลูกศรแดง) วิธีการนี้จะช่วยให้สีของหน้าผานั้นดูมีแสงและเงาที่ส่องกระทบอยู่ และทำให้หน้าผาไม่ดูแบน
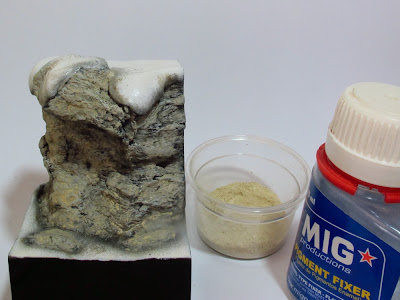
11. I begin weathering the cliff using MIG pigment mixed with Pigment Fixer. The mix is applied and left to dry.
11. จากนั้นทำการ weathering (การทำคราบสกปรก) ด้วยสี pigmentsของ MIG ผสมกับ Pigment Fixer ทาให้ทั่วส่วนของหิน และทิ้งไว้ให้แห้ง
11. จากนั้นทำการ weathering (การทำคราบสกปรก) ด้วยสี pigmentsของ MIG ผสมกับ Pigment Fixer ทาให้ทั่วส่วนของหิน และทิ้งไว้ให้แห้ง
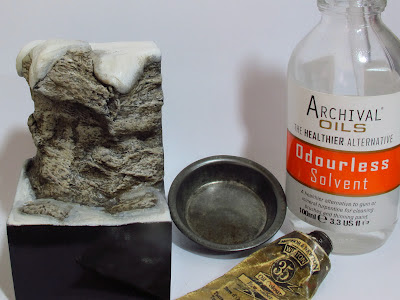
12. Using Windsor & Newton Raw Umber (no.35) mixed with turpentine, I create the oil wash. This is then applied to the whole area, with more emphasis in areas such as crevices where shadow falls.
12. จากนั้นใช้สีน้ำมัน Raw Umber ผสมกับ turpentine นำมา wash ให้ทั่วอีกครั้ง และทาเน้นในบริเวณร่องเงาต่างๆ เพื่อให้ส่วนเงานั้นเด่นชัดขึ้น
12. จากนั้นใช้สีน้ำมัน Raw Umber ผสมกับ turpentine นำมา wash ให้ทั่วอีกครั้ง และทาเน้นในบริเวณร่องเงาต่างๆ เพื่อให้ส่วนเงานั้นเด่นชัดขึ้น
13. The snowy ground was painted by using white colour from MAX.
13. ทาเก็บสีของหิมะ ด้วยสีขาว MAX
13. ทาเก็บสีของหิมะ ด้วยสีขาว MAX
14. For highlighting, diluted white paint is applied to add some details to the rock using fine brush. I focus only on some edges of the rock, not all of them. Using diluted paint make the results not too opaque, allowing a more natural colour dimension as the white don’t ‘pop out’ too much.
14. ใช้สีขาวที่ผสมให้สีนั้นเจือจาง ทาเก็บรายละเอียดของแสงบนก้อนหินอีกครั้งด้วยพู่กันขนาดเล็ก โดยทาเน้นเฉพาะบริเวณสันของก้อนหินในบางจุด ไม่ต้องทาทั้งหมด ซึ่งการผสมให้สีเจือจาง จะทำให้เวลาทานั้นสีจะไม่ทึบในทีเดียว สีขาวจึงไม่ดูโดดออกมาและช่วยให้เกิดมิติของสีได้ดีกว่า
14. ใช้สีขาวที่ผสมให้สีนั้นเจือจาง ทาเก็บรายละเอียดของแสงบนก้อนหินอีกครั้งด้วยพู่กันขนาดเล็ก โดยทาเน้นเฉพาะบริเวณสันของก้อนหินในบางจุด ไม่ต้องทาทั้งหมด ซึ่งการผสมให้สีเจือจาง จะทำให้เวลาทานั้นสีจะไม่ทึบในทีเดียว สีขาวจึงไม่ดูโดดออกมาและช่วยให้เกิดมิติของสีได้ดีกว่า


No hay comentarios:
Publicar un comentario